Thursday, March 15, 2012

Apex 460 Capsule Mod

APEX 460 Capsule Mod


Welcome, this page was created as a visual guide to assist those of you who want to mod your Apex 460 tube microphone with some of the great aftermarket parts available. This tutorial in-particular will be dedicated to changing the stock capsule to a Peluso CEK-12. Please note that I am not a professional in the electronics industry but merely a music producer who wanted to help out others with these mods. Do this mod at your own risk and only if you have experience in basic eletronics and soldering!


Below is the Peluso CEK-12 as it was delivered. When I spoke to the Canadian distributor of Peluso products he said that this is the one that most people get. It is a re-creation of a capsule from the AKG CK-12 Microphone. There are also other options as well such as the CEK-89 which is a re-creation of a Neuman style capsule.


The first thing to do is unscrew the bottom off the Apex 460's casing and slide the long tube off.


Next you have to take off the protective screen. To do this remove the screw at the bottom of the screen.


Removing the screen will reveal the original 460 capsule.


A rather nude Apex 460!


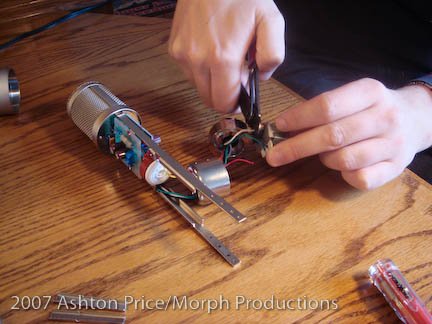
Cut off the wires, preferably as close to the mic as possible to give you as much wire to work with as possible. This step is more or less the point of no return so again I'd like to say you're doing this at your own risk!


Next comes the physical removal of the capsule from it's mount. There are two screws on either side of the capsule


Next comes the removal of the old capsule mount itself


I found that the mount for the new Peluso capsule didn't have a big enough hole to allow the Apex screw to go in flush so I carved out a bigger hole. Doesn't that pic look like an accident waiting to happen!


Nice and flush!


Peluso capsule on the left, stock Apex capsule on the right. Note the slightly bigger size of the Peluso capsule.


The holes that you use to mount the capsule to the mount are also the holes that attach some wires (I'm assuming the ground wires) to the mic. Unscrew these (DO NOT UNSCREW THE RED WIRES!) so you can put the screw through the mount first.


Attach the capsule to the mount by running the screw through the mount, then the ground wire into the capsule itself.


Next comes the electrical part. Start by stripping all the wires.


The colour coding for attaching the wires is relatively self explanatory. Red on Copper and Grey on Silver. There are two ground wires on the Peluso capsule but only one on the original so both have to be soldered to the same ground.


After you've attached the wires you have to solder them. Due to the nature of solder and the way it can spit I made sure to have someone hold a bag in front of the capsule to protect it from solder.


Next cover up the exposed wire with electrical tape.


Now that you're done you can close the mic back up and start recording. Goodluck!


Click Here For MP3 Comparisons


Relevant Links:

Here's the capsule I used available at Amazon:


Peluso Microphone Lab - Website for Peluso Microphone Lab

Cinemag- Makers of great transformers. The Apex 460 uses the CM-2480 output transformer. Check out our picture tutorial for that as well

Morph Productions- My music production/recording studio website (How I make a living).

Here's some other mods:


Catch me on the sites:


Apex 460 Transformer Mod

APEX 460 Transformer Mod


Welcome, this page was created as a visual guide to assist those of you who want to mod your Apex 460 tube microphone with some of the great aftermarket parts available. This tutorial in-particular will be dedicated to changing the stock transformer to a Cinemag CM-2480. Please note that I am not a professional in the electronics industry but merely a music producer who wanted to help out others with these mods. Do this mod at your own risk and only if you have experience in basic electronics and soldering!


The first thing to do is unscrew the bottom off the Apex 460's casing and slide the long tube off.


The Apex 460 without it's protective casing.


At the bottom of the mic on either side are 4 tiny screws. Remove them.


After the screws are removed separate the bottom casing to reveal the transformer.


You'll find the transformer in the top half of the casing. You won't really be able to access it properly until a few more steps.


Remove the tube from it's socket. Try to avoid touching it with your hands.


There's some metal slats that hold in the wires from the circuit board to the transformer and mic output. These slats have to be removed so you can get the slack you need to slide the top of the transformer casing to get at the wires.


The inside slats will pop off with a screwdriver. Remove both on either side.


With the slats removed you will have the slack with the wires required to slide the top casing up to give you room to get at the transformer.


Slide the top of the transformer casing up the wires. Now we have the room needed to get at the transformers wiring.


Exposed transformer!


Cut the wires from the transformer at the base of the transformer to give you as much wire as possible to play with. This would be the point of no return so again I will remind you that you're doing this at your own risk!!!


Strip the wires on the mic and the Cinemag transformer to prepare for soldering. You can also cut off some of the excess wire from the Cinemag transformer as you won't require them to be so long.


Tin all the wires you're about to solder


The colour coding for the connections is as follows (this worked for my mic, if for some reason it doesn't for yours I'm not responsible!):


Apex 460       Cinemag CM-2480   Peluso


Red         Red


White         Brown


Green         Yellow


Black         Orange


Tape up the connections and put the mic back together.


Now that you're done you can close the mic back up and start recording. Goodluck!


Click Here For MP3 Comparisons


Relevant Links:


Peluso Microphone Lab - Website for Peluso Microphone Lab


Canadian Audio Distributors-Canadian distributor for Peluso capsules and microphones


Cinemag- Makers of great transformers. The Apex 460 uses the CM-2480 output transformer. Check out our picture tutorial for that as well


Morph Productions- My music production/recording studio website (How I make a living).


If you're looking for a good price on an Apex 460 click below:


Catch me on the sites:


Wednesday, March 14, 2012

APEX 210 Transformer Mod

Welcome, this page was created as a visual guide to assist those of you who want to mod your Apex 210 ribbon microphone with a new transformer. Please note that I am not a professional in the electronics industry but merely a music producer who wanted to help out others with these mods. Do this mod at your own risk and only if you have experience in basic electronics and soldering!


Our subject, an Apex 210 microphone


While not necessary it'll be easier to take the mic's mount off to get it off the way. Simply unscrew the thumb screws and pull the mount off.


There are three screws around the mic. Unscrew them to remove the blue base of the mic.


Gently pull the base off the mic's pop screen.


The transformer is mounted behind a pcb board in a metal cylinder. To access this cylinder you have to uncrew it from the board. It's attached with two screws.


Pulling off the cylinder from the pcb board reveals two screws holding the top of the cylinder which contains the transformer.


When you take the top of the cylinder off you will see the transformer. It's attached within the cylinder with double sided tape.


Cut the wires off the transformer as close to the transformer as possible to give yourself as much wire to play with as possible. This is the point of no return so again I remind you you do this at your own risk!


Below is the Cinemag CM 9888 transformer with the wires stripped. Cut all the wires down a bit. Cut the white wire so it is considerably longer then the others.


Strip the wires from the mic and tin them with your soldering iron.


The colour coding for the connections is as follows (this worked for my mic, if for some reason it doesn't for yours I'm not responsible!):


Apex 210       Cinemag CM-9888


Red         Red


White         Brown


Green         Yellow


Black         Orange


White will be soldered to the copper ground wire that is attached on the other side of the pcb board.


This is what David Geren from Cinemag has to say about the length of wire going to the transformer:


"Keep the wires from primary to the ribbon itself as short as possible. Even shortening it a couple of inches can make a big difference. Keep in mind that the ribbon motor itself typically has a d.c.r. of less than one (1) Ohm. Saving even 1/10 Ohm becomes an important factor in the performance of the microphone."


Based on this we could have probably made the lengths of our wires shorter. Just so you know!


Thread the white wire through the top of the cylinder and around the pcb board.


Solder the white wire to the copper ground wire.


Put the cinemag transfer into the cylinder.


The cinemag transformer is already in it's own casing that prevents it from fitting properly in the Apex cylinder. For lack of a better mounting option use tape (I used electrical tape) to seal the cylinder top around the cylinder.


Screw the cylinder back onto the pcb board.


Run some tape from the mic to the cylinder to keep it firmly in place so it doesn't rattle with loud noises.


Now that you're done you can close the mic back up and start recording. Goodluck!


Relevant Links:


Peluso Microphone Lab - Website for Peluso Microphone Lab


Canadian Audio Distributors-Canadian distributor for Peluso capsules and microphones


Cinemag- Makers of great transformers. The Apex 460 uses the CM-2480 output transformer. Check out our picture tutorial for that as well


Morph Productions- My music production/recording studio website (How I make a living).


If you're looking for a good price on an Apex 210 click below:


div style="margin-bottom: 0px; margin-left: 0px; margin-right: 0px; margin-top: 0px;">


Catch me on the sites: