Saturday, December 3, 2011

DIY - Soundproofing a Home Studio

As many of you are aware Morph Productions moved to a new location in the middle of august this year.  It was really important for me to keep the studio at my home or else my family would never see me.  Equally important was keeping it in downtown Toronto near the subway.  Unfortunately (or in many ways fortunately!) the houses in downtown Toronto are very old and thus have basements with really low ceilings which are not ideal for anything except storage.

The challenge for myself and my partner was to find a place that worked for both of us at a cost that would allow us to do the reno's I needed to do to make a workable space.  This would almost definitely include digging out the basement for extra ceiling height along with soundproofing and finishing.  Not cheap!

In May we ended up getting lucky and getting a great place in a great area near Bathurst and Dupont.  The basement was unfinished which worked great for us because it meant we weren't paying for something that we were ultimately going to tear out.  Here is a picture of the original basement the day we moved in:


I jokingly called this picture "best studio ever" cause it would definitely take a lot of imagination to picture this ever being a workable space.  I'm not going to go into the whole transformation in this blog but if you want to see some pics of things as the progressed go to my Morph Productions Facebook Page.  In the future I'll probably do a blog about the underpinning process simply because there isn't a lot of info out there.  Stay tuned for that later.

So lets fast forward about a month and a half or more after the digging, underpinning and framing is done and talk about soundproofing.  Soundproofing was of critical importance to me because in downtown Toronto houses are built pretty close together and to make things more complicated we're in a semi so we're connected to one neighbour.  I also wanted to make sure I didn't disturb my family and more importantly (shhh) they didn't disturb me.

Before we proceed I should distinguish between "soundproofing" and "sound treatment".  Soundproofing is keeping the sound localized in your space so you don't drive your neighbours and family nuts.  Sound treatment is treating the rooms you've created so they have an optimal sound by lessening reflections from walls etc.  The funny thing about soundproofing is that it actually makes the job of sound treatment more difficult because by keeping the sound in your space you actually have more sound to deal with.  This blog is strictly about soundproofing.  If you're interested in sound treatment I used Primacoustic wall panels along with their bass traps and ceiling clouds.  It's great stuff! 

After doing a lot of research on soundproofing I opted for green glue for the walls and ceilings along with Whisper Clips for the ceilings (in some cases along with the green glue).  Here is a picture tutorial of all the things I did to soundproof my new basement studio.

1.  As soon as the work was started I kept looking up into the floor joists at the old 3/4" subfloor with squeaks and cracks galore and thinking "I should really seal that up somehow".  I'm someone that can take things too far sometimes and I ruled it out initially.  At some point I was on the Green Glue company's website and they were mentioning that you can screw drywall up there with their green glue sandwiched in-between.  Unfortunately I found this out AFTER the digging so instead of very easily putting up the drywall I had to use a step ladder but nonetheless I got it done.  I used 2 layers of 5/8" drywall with a bunch of green glue sandwiched in-between.  Here's a picture:


2.  The next line of defence was tons of insulation.  Of course we went with tried and trued Roxul.  The ones we used are "ComfortBatt" and "Safe and Sound".  ComfortBatt and Safe and Sound are the same type of product but have different uses.  ComfortBatt is insulation with some soundproofing capabilities whereas Safe and Sound was meant strictly for soundproofing of interior walls and ceilings.  Wherever possible the insulation was doubled up and it curved into each other from wall to ceiling for a continuous layer of insulation.  The ComfortBatt was used on the outside walls followed by a layer of Safe and Sound.  The ceiling had two layers of Safe and Sound.  You could hear things deaden pretty quickly after that process was finished!  Here's some pics:

We used more than this but man this is a lot!

Here it is installed:

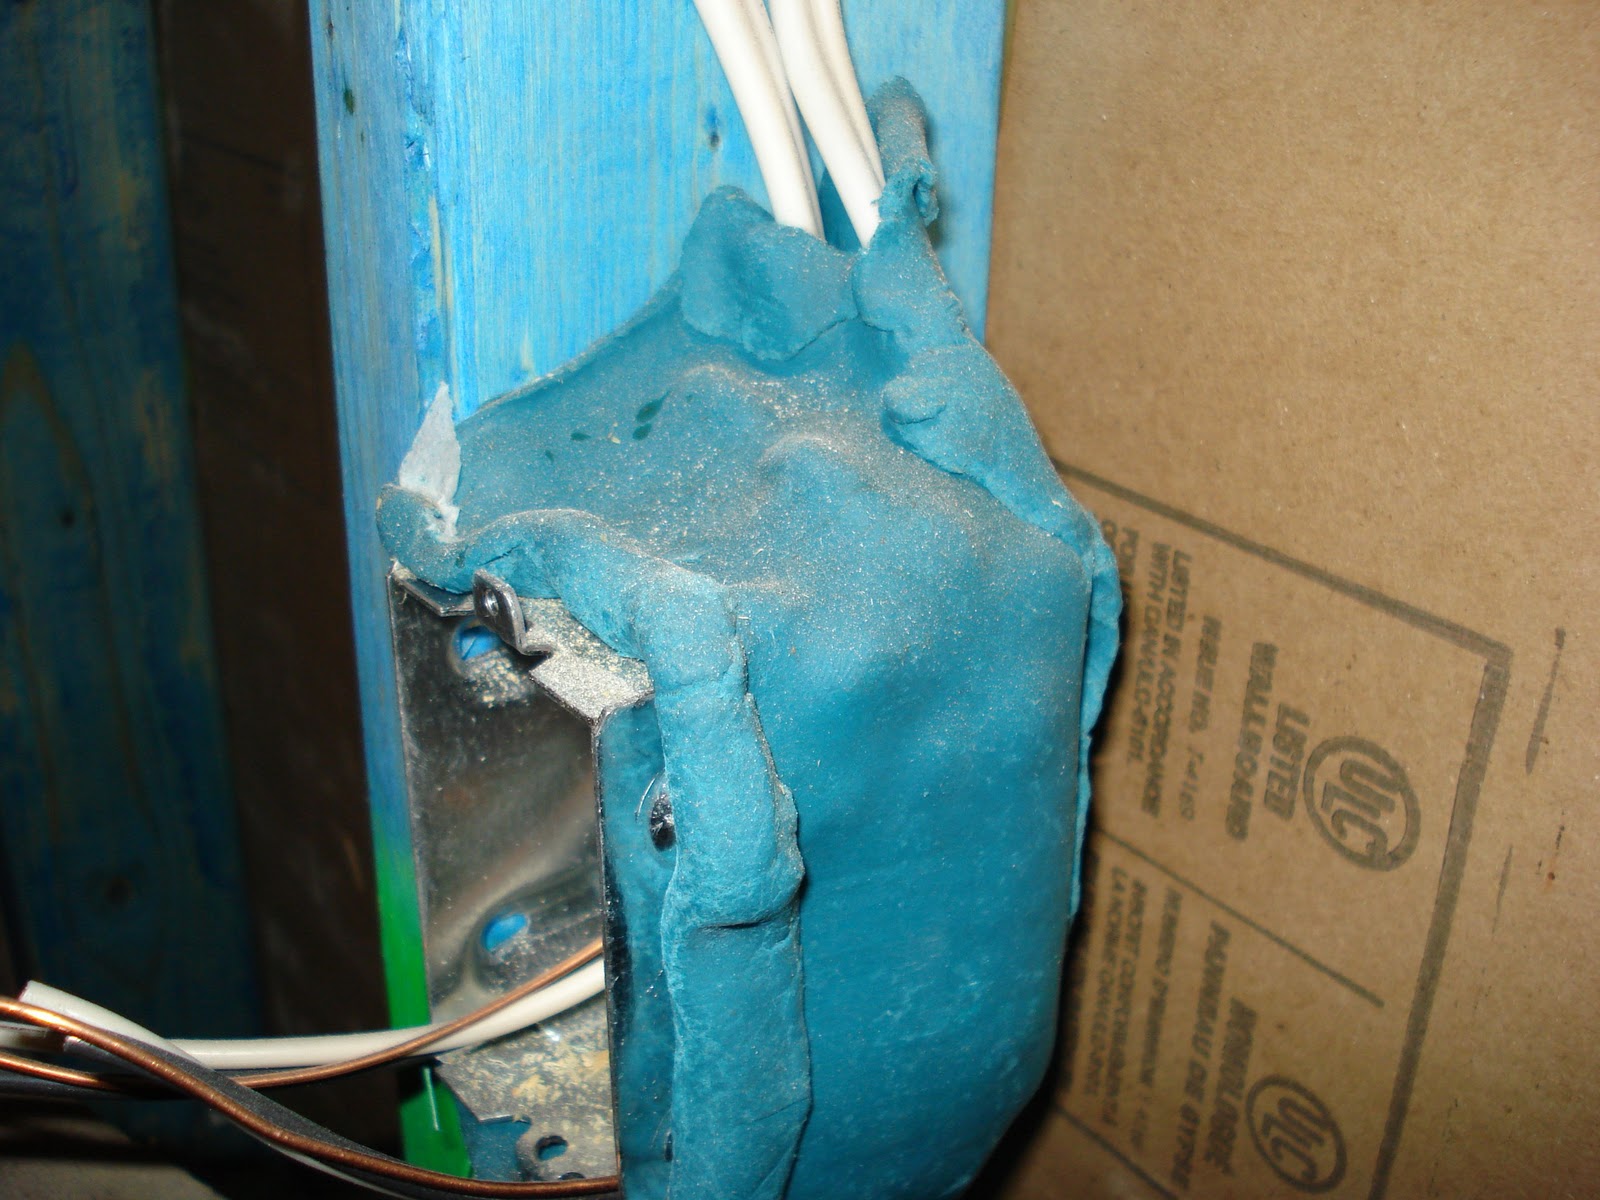
3.  Before putting the drywall in we used Quiet Rock's "Quiet Putty" behind all electrical boxes.  To up the ante a bit our contractor Enrico from Peloton Contracting used exterior electrical boxes which are better sealed than interior ones (not pictured below).  As pictured the Quiet Putty wraps around the boxes to prevent the sound from escaping through them.  Sound should be considered as water.  If you have a great soundproofing system that has holes in it the sound will find its way out!


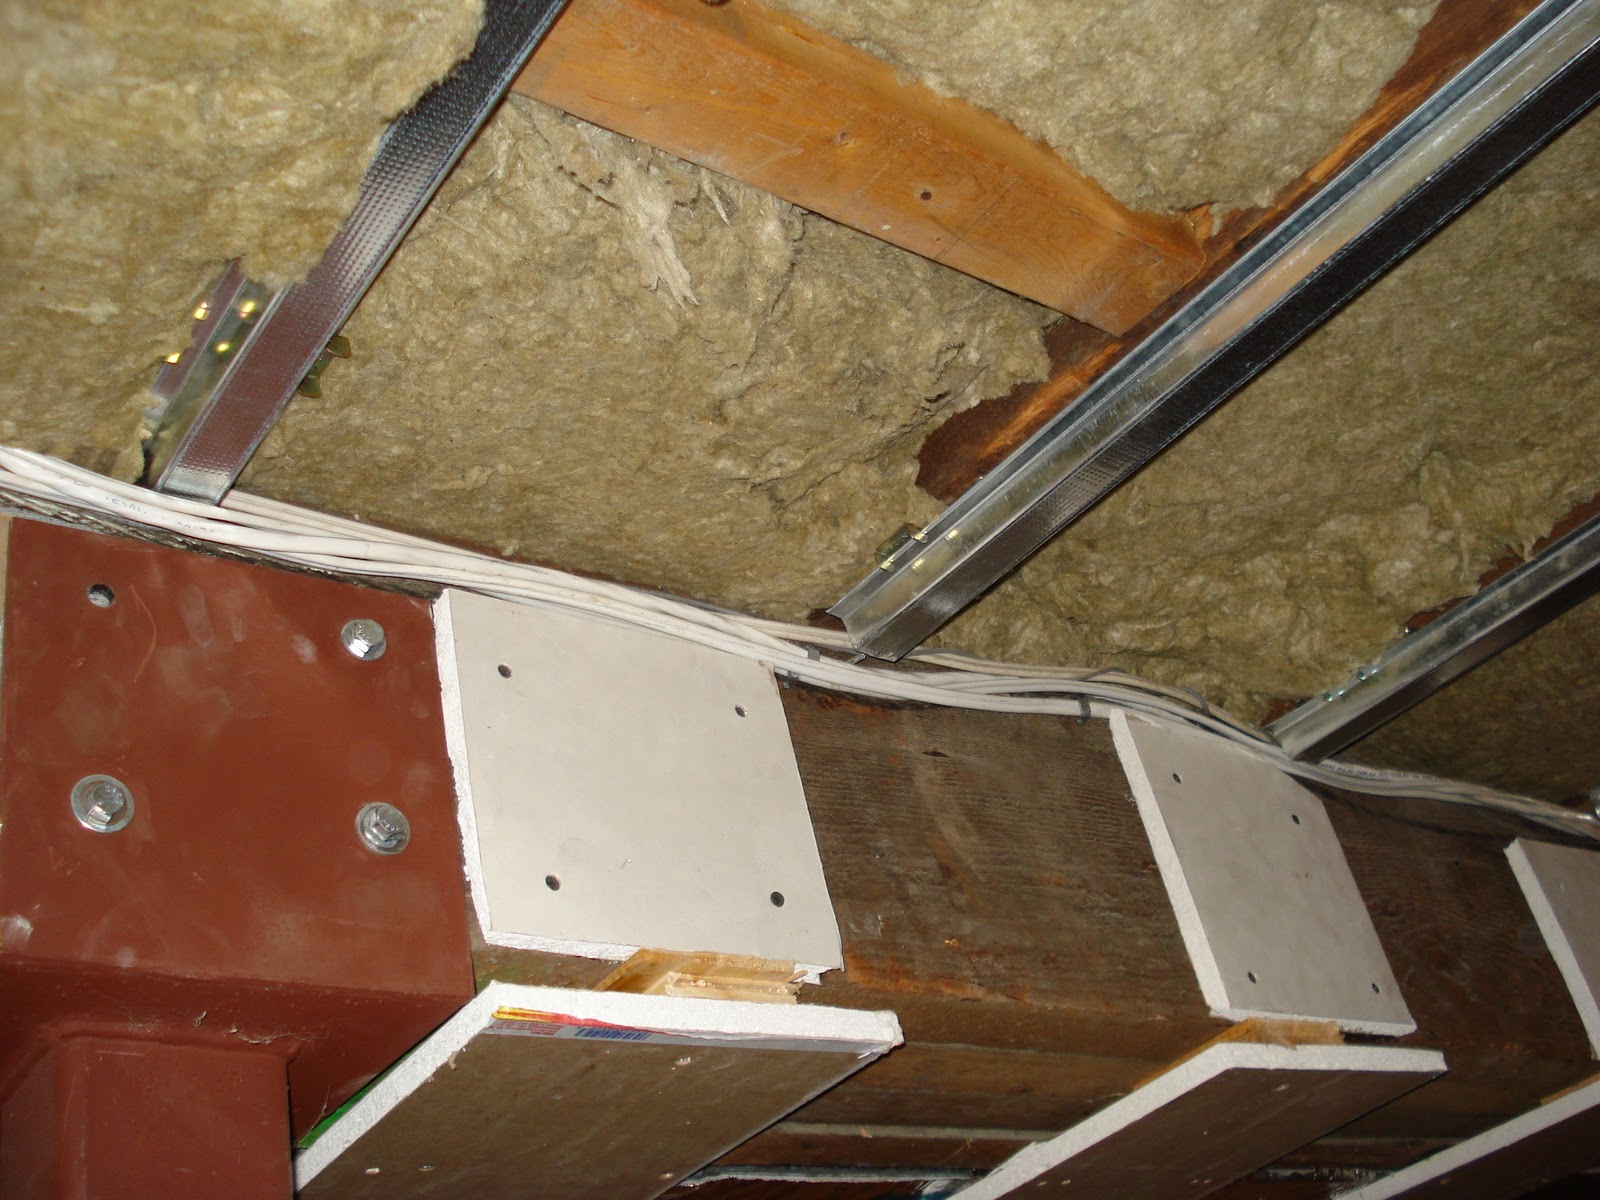
4.  Another way for sound to escape and noise to be created is internal ducting for the studio.  To make that less of an issue I got some flexible ducting at Home Depot and snaked it in S patterns within the joist to make it harder for the sound to go straight into the system and throughout the house.  The ductwork is made up some sort of plastic tubing covered in insulation and then covered with more plastic.  Will it prevent sound from moving around it entirely?  Nope but it will help for sure.  As a bonus the sound of air passing through the ductwork when the furnace/air conditioner is on is lessened as well.  Not pictured is what I did to the trunk of the HVAC and ducts that led upstairs.  I used a sticky foam tape that had foil on it to dampen and insulate.  I also got that at Home Depot.  


5.  For the ceilings we used the Green Glue company's "Whisper Clips" that are made to mechanically disconnect the floor above from the studio ceiling.  They're basically a clip that a furring channel attaches to.  When it comes time to install the drywall it is screwed to the furring channel rather than the floor joists.  If done correctly (most important is that screws used aren't long enough to penetrate the floor joists) the ceiling should flex a bit.  This system was used throughout the ceiling and in the recording room an additional layer of 5/8" drywall was used with lots of green glue.  

Here's a pic of the furring channel/whisper clips in action:


6.  Not pictured was the extensive use of the Green Glue company's acoustic sealant.  This goes around the perimeter of the drywall seams to make sure sound doesn't go out through them.  You don't have to do the internal seams as long as you make sure that the seams for both layers of drywall don't line up.  As I learned the hard way you have to make sure to make your seams nice and neat or the drywall taper won't be happy with you when he's doing his job.  I ended up having to scrape off a bunch of the sealant before he came.  I should also mention that because of timing/supply issues I got a bottle of the competitions product "Quiet Seal" and I really didn't like it.  It was oil based, incredibly hard to work with and was cracking within a few days.  I definitely wasn't impressed.

7.  So after all that was done there was drywalling to do.  I had considered Quiet Rock drywall but I had read enough on the web that it wasn't worth the price and my contractor confirmed that as well.  We decided to go with the thickest drywall available which is 5'8th's and we doubled it up with a healthy dose of green glue in-between.  2 tubes of green glue per 4x8 piece of drywall is recommended for the best cost benefit but for critical spaces 3 tubes is ideal.  Here's a picture of 3 tubes of green glue on a piece of drywall for the recording floor.


Here's a pic of some of the green glue goop escaping the drywall layers.  If this place is ever demoed in the future there's going to be some very confused contractors!


Lots of green glue tubes being used:


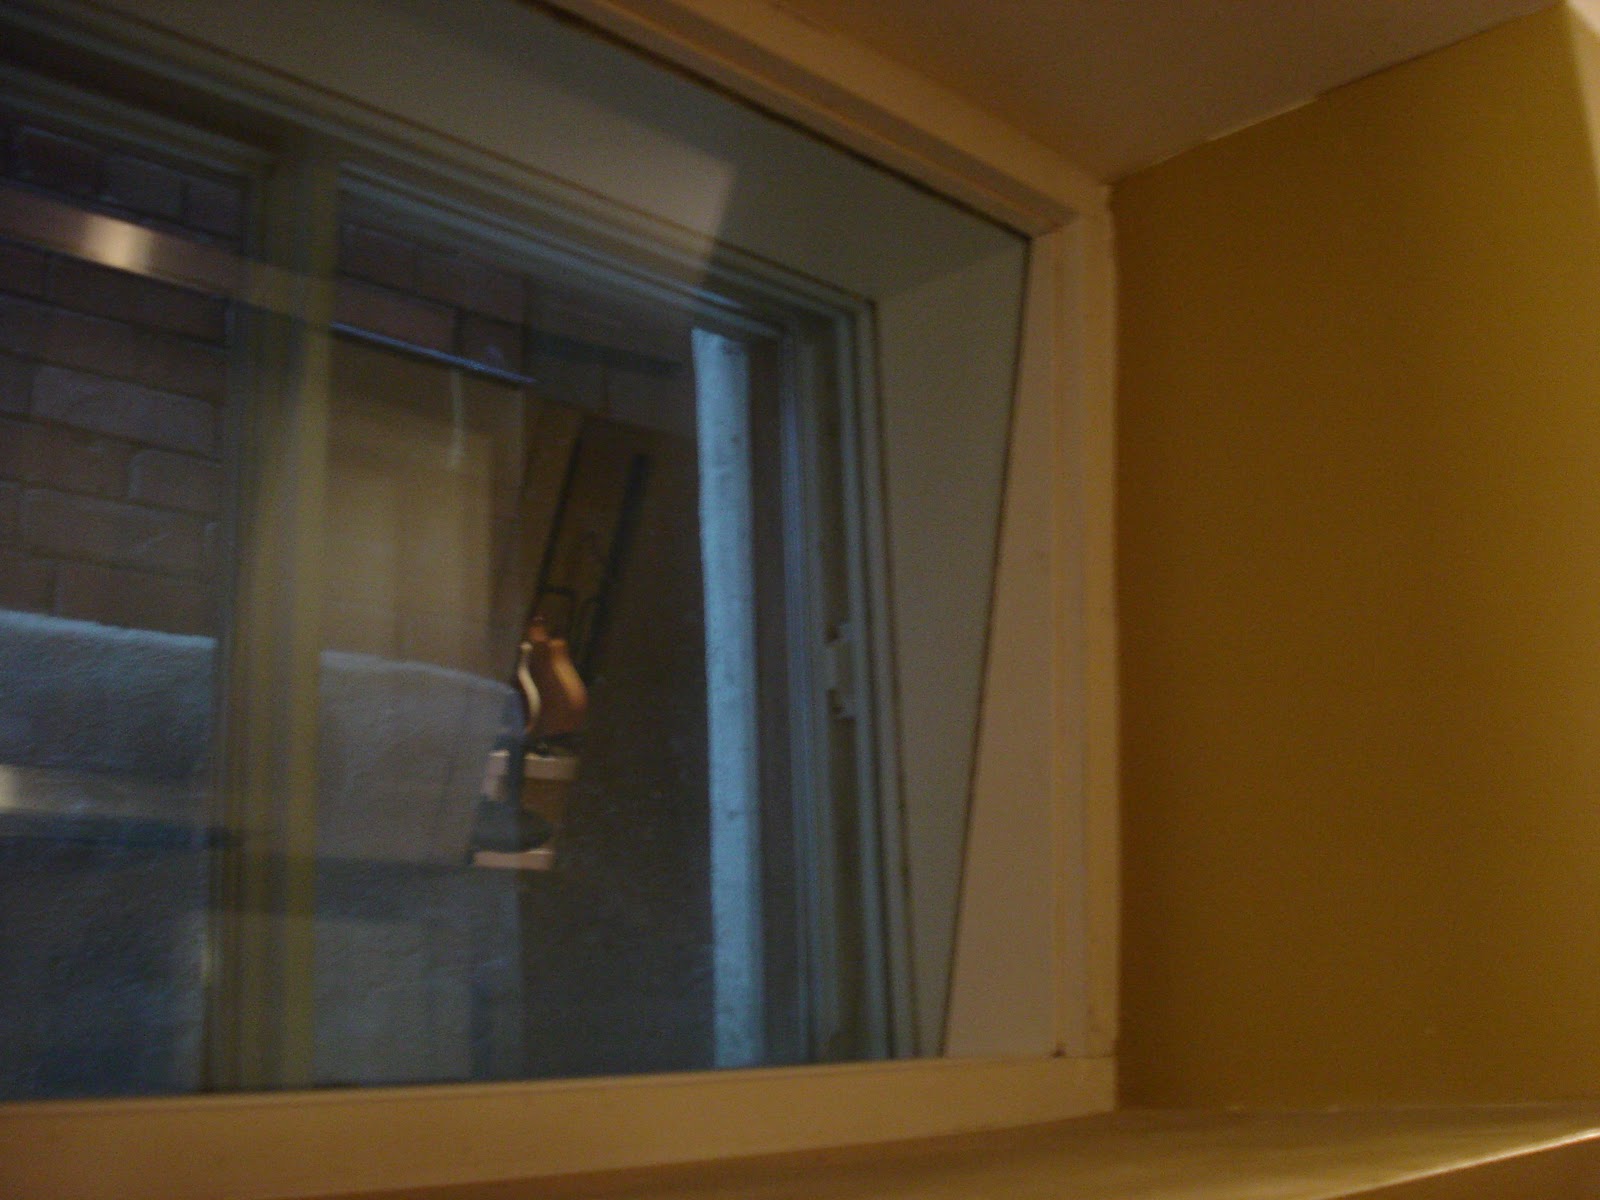
8. Windows are a big weak spot for soundproofing.  In order to minimize this the fine folk at Peloton built a window box and inserted three pieces of thick tempered glass in it and placed the contraption over the existing window.  You'll note that one piece of glass isn't as thick as the others.  This is so the glass doesn't have the same resonating frequency.  By not having the same resonating frequency the sound further gets broken up on it's way out the window and less energy is transmitted.  Here's some pictures of the window box.  A router was used to make the grooves for the glass to fit in.


Here it is installed.  Note the internal pane of glass is tilted down so the sound bounces down to the floor instead of directly into the microphones.


For additional window soundproofing I made a window plug.  To see how I did that check here - Window Plug Blog.

9. The last part of the soundproofing I'm going to go over is what was done for between the live and control room.  Obviously you want as little sound spilling between the two so that your signals being recorded aren't also recording spill over from you monitor speakers.  You also want to make sure that what you're judging from your monitor speakers is not being affected by what's coming through a less than perfect door!  

The first step that was taken was choosing one hell of a heavy MDF door.  When you close this thing you can feel how heavy it is.  The next step was sealing the door and the frame as much as possible.  For assistance I called on ASL soundproofing and they had some great door solutions.  I chose a door saddle (the bottom piece), some gaskets (the stuff that go on the sides and top) and a specialized soundproofed bottom as well:

Door Gaskets (The discolouration is GG company sealant.  You can't see it with the eye, it just showed up on camera):


Door Saddle:


Last thing to install was the soundproof door bottom from ASL Soundproofing.  This nifty device is installed on the bottom of the door and when you close the door this little brass nut that sticks out a bit on the side gets pushed in and pushes a neoprene seal down on the door saddle which provides the seal.  Unfortunately mine was a bit long so I had to cut it down with a hacksaw which wasn't fun.  Once that was done I installed it as directed and adjusted it so I could open and close the door and get the seal I wanted.  Here's some pics:


You can see the brass nut sticking out on the side in this picture.  This can screw in or out to adjust how much you want the neoprene seal lowered.

You can see the brass nut pushed in against the doorframe.  This lowers the neoprene seal down on the saddle for a good seal.


Here's the door soundproofing all together.  Not pictured is the top gasket which is the same as the sides as pictured.


In closing we used about 30 bags of insulation, 6 cases of green glue (72 tubes), 125 whisper clips and 16 tubes of acoustic sealant to soundproof the studio.  While it cost me thousands of dollars to do it was probably the least expensive part of the reno.  There's many other ways to soundproof a space but I think the way we did this studio had a good cost/benefit ratio along with saving as much space as possible.

The Results

I used an iphone db meter app (one of the ones which had a good review) and tested the sound outside with and without the window plug (click to check out the window plug blog).  Here's the results:

Sound level in middle of room:              95db
Sound level outside by the window:      56db
Sound level outside window /w plug:    47db

It should be noted that 47db was about the residual noise in the neighbourhood (9pm friday night) because that's the level I had outside without any music playing at all.  To give you an idea of a relative measurement a small car driving past gave me a reading of 69db.

Anecdotally the sound coming out of the house was noticeably quieter with the plug installed in the window but considering how loud it was inside it was barely audible outside with or without the plug.  Good news indeed!

If I get a chance I'll retest with a more professional db meter if the opportunity arises.


Gotta give props where they're due.  If you're in the Toronto area can't recommend these guys enough:

Real Estate Agent:  Jesse Shifrin.  It wasn't easy finding a place that worked well for family life along with a place that I could work out of.  Jesse was very patient and never once did we feel that he was trying to rush us into a place we didn't want.  You can check out his site here: http://www.torontopropertyhomes.com/

Contractor: Enrico of Peloton Contracting was very helpful through this whole process and you could tell his whole crew really cared about the work they were doing.  Can't recommend them enough!  Here's a link to his site:  http://pelotoncontracting.squarespace.com/

Soundproofing:  I got most of my soundproofing stuff from Avigdor at ASL.  They're a great local company which is nice to have nearby.  You can check his site here:  http://www.aslsoundproofing.com/


If you're not in the GTA you can always get a lot of the stuff from Amazon.com here:


Get More useful info from me at the following sites:


Friday, November 4, 2011

Music Recording Schools

Quite regularly I get emails from young people asking me what recording schools I recommend.  When I was in the same position in the mid nineties there wasn't a lot of options in Ontario; you had Fanshawe college as the "public" option and a bunch of private schools with varying degrees of reputations.  Currently there's a lot more choice as a few more public colleges have started programs and the list of private schools offering programs is getting pretty long.  I often joke that there's more recording schools out there than there are actual recording jobs!

As with anything in life you always have to be focused on your goal first and destination second.  That is to say, figure out what you want to do and then devise a plan on how to achieve it.  In this situation it's always best to talk to people doing what you want to do and find out how they got there.  If you decide you're going to take a post secondary program do extensive research.  The cost of going to one is most likely going to saddle you with a lot of debt so you want to make sure that the place you're going to is respected in the industry.  I won't be getting specific here but there are definitely some very good and very bad options out there so do lots of research.

Here's some things you can do to make sure you go to the right school:

1)  Ask a bunch of people established in the industry what schools they prefer to see when hiring.
2)  Talk to past and current students of the program and ask them what they think of the program.
3)  Find out the curriculum and what the ratio of lesson to lab time is.  Make sure that this fits your learning style and goals.
4)  Find out the names of the people teaching the courses in the program and make sure they have the credentials and experience that you feel will benefit you on your career path.

For what it's worth I went to Fanshawe College's MIA program and I would definitely put it at the top of the list education wise.  The interns I've gotten from there have always been top notch.

Some of the better schools you apply to may be difficult to get into and will require some work for applications.  It will improve your chances dramatically if you can get some experience before going to school.  Having experience will also help you get more out of the program as well.  A year or two isn't a lot of time to teach all that has to be learned so the more you know going in, the easier you'll be able to grasp some of the more complicated concepts you'll be taught.  It's unlikely that you'll be getting any great internships without experience or post secondary education so you'll have to get out there and create your own opportunities.

When I was growing up I lived in North Bay Ontario, so there really wasn't a lot of opportunities in the music industry.  I tried to create as many as possible to gain experience with whatever limited resources I had.  This usually involved recording people for free on my 4-track cassette recorder as much as I could. I even developed and produced a charitable compilation cassette for an environmental organization which involved me recording 14 different artists in the community.  Was this something that was going to make me a big success?  Not really but it was a good cause and was a good, albeit small stepping stone for me.  My point is that this is a very difficult business and you have to create your own opportunities.  You can't just wait for things to happen.  The reference letters and experience that I gained from that project and many more assisted me to getting to Fanshawe and from there to here.

Going along with that theme I should mention how important it is in general to create your own opportunities if you expect to make a living in the music industry.  It's never been an easy business but now a days it's very difficult.  I get a few emails a week from people wanting to intern with me for free and because of the work I do I generally don't have much for them to do as I prefer doing it myself.  Imagine an industry where you can't even get a job working for free!  Not exactly promising but not impossible.  Just work hard and don't expect things to fall in your lap.  Seek out and create the opportunities that are out there with an industry in transition and create your own success.


Catch me on the sites:


Sunday, July 17, 2011

How to change the ram in an Acer Aspire 5500z laptop

This may seem like a random post since I'm largely a mac user but I recently upgraded the ram in my sisters Acer 5000z laptop and figured I'd throw up some pictures on the blog for those who may be intimidated by doing an upgrade like this.  If you find your computer slowing down a ram upgrade can be the simplest and cheapest way to give it some new life.  Ram upgrades are generally the easiest upgrade you'll do to a computer but for those with a faint heart it doesn't hurt to have a tutorial.  Please keep in mind that I am not a professional computer technician and this blog is only for advising purposes.  Please do your own research and do this upgrade at your own peril!

To upgrade the ram on the Acer 5500z you need to buy some ram chips.  Luckily the type of ram these machines use is really cheap.  I picked up 2 - 1 gig chips of kingston ram for 40 bucks.  Not bad!  The type of ram this machine uses is:

DDR2 Non-ECC 533MHZ SODIMM chips.  These are 200 pin chips.  Here's a link to get the chips I used for a good price:


Here's a pic of the laptop with the ram chips beside it. Pretty huh?  ***IMPORTANT*** Turn the computer off unplug the laptop and  take the battery out as well to make sure you and your computer are safe.


So now that you got the ram lets get to work!  Flip the machine over and hopefully you'll see what's in this picture below.  I've circled the compartment in red and made some arrows pointing at the two screws you'll be removing.  As you can see I'm not a computer technician but I'm also not a photoshop expert either. :)


Once the lid is open you'll see a ram chip or two.  There's clips on either side that you can gently click away from the ram.  After you've done that the ram will pop up a bit and you can slide it out.


There's two spots for ram chips.  Just do the reverse of what you did to get them out.  Pop the chip in, push it down and clip it in.  


Once that's done put the cover back on and you're good to go.


Catch me on the sites:


Tuesday, May 17, 2011

Making Your Mix Engineer Happy - Recording Tips

More and more people are recording themselves and are finding themselves getting stuck at the mixing stage.  A lot of times I'll get a call saying "I just can't get it to sound right".  There can be many reasons for this but at this point it might be good to get a professional involved to finish off the project.  I do mixing for other producers, people who were at studios and were unhappy with the final result, and people recording at home who want me to polish things up.  I thought I'd make a blog posting on how to best record your project to give a future mix engineer maximum flexibility.  Here's a few tips:

1.  When recording your drums record single hit samples of all the drums but mainly the snare, kick and toms.  The reason for this is that you have some good samples that you can feed in when needed.  Generally speaking this is invaluable for toms that were played when the cymbals and/or ride were blaring in the mic and a clean signal isn't possible.  With the samples you can just drop them in place of the noisy tom hits for a cleaner sound.

2.  When recording your guitars use a DI to split the signal so you can record the direct signal from your guitar as well as the amp signal.  This one is really crucial because if your mix engineer wants to try out some new guitar sounds by re-amping or running the DI signal through an amp simulator plugin.  When you give your mix engineer this the possibilities are endless!  I personally use the Radial JDI MK3 Passive DI.  You can pick one up here:


3.  Another help is recording the midi output from any keyboards in addition to the audio output.  Most sounds are internal in the computer now anyway but if they're not it's great to have access to midi files to change sounds at the mixers discretion.  This is especially important for the more urban/keyboard based songs with electronic drums.  It's always great getting the midi files to replace or supplement the original sounds.

4.  Last but not least is labelling and organizing your tracks neatly so your mix engineer isn't pulling his (sometimes sparse!) hair out trying to figure out which track is which.  It's amazing how many times I've mixed a track only to find out that I used the wrong guitar tracks as the "main" tracks because they weren't labelled properly.  Here's a FAQ I made on how to do this: http://www.morphproductions.com/toronto-recording-studio_faq.html#mixtips

If you know you're going to use a mix engineer to finish off your project it wouldn't hurt to contact them in advance for any other tips or preferences they may have.  As with anything else planning is key!


If you want more info on getting your track professionally mixed feel free to contact me @ [email protected] or check out my website below for more info:


Catch me on the sites:


Wednesday, March 30, 2011

Diskwarrior- Hard drive Recovery for Mac

It's been a while since I posted because the studio has been crazy busy but I figured I'd spend a few minutes to give a shout out to a great company.  In the 12 years since starting my Toronto Studio - Morph Productions, I've been fortunate to not have a major hard drive problem on the studio computer.  Just in case though I do have two separate back up systems (both hardware and software) in case something does though.  I have had problems with personal hard drives of no consequence and I have to tell you that Alsoft's Disk Warrior can provide minor miracles.

The real reason I'm writing this post though is to give these guys a shout out because their tech support is incredible.  The first time I had an issue with a drive I bought Disk Warrior to see if it would fix it.  It didn't and I thought to myself, "that was a quick way to lose a hundred bucks".  I read in the instructions that if DW can't solve an issue you can contact tech support for further help.  They really aren't kidding!  What followed was about 2 hours of on the phone tech support that easily should have costed me hundreds of dollars.  They ended up fixing my problem and no data was lost.  Incredible!

Just recently I had a backup drive fail in the midst of me reinstalling everything on my sons computer and sure enough DW tech support came to the rescue with about an hour of tech support.  These guys should really be commended for all the help they offer people.  I can't say enough good things about them.  Hard drive space is cheap so always have backups but if you need a drive fixed check out Disk Warrior.


Catch me on the sites:


Sunday, January 23, 2011

How To Create An Arpeggiator In Logic Pro

An arpeggiator is a feature available on some synths and software packages that plays notes individually in a patten according to the chords played by the user. It's a feature that has been used in many forms of electronic music for decades and has also found it's way into other popular forms of music like rock and pop through the years.

Many people aren't aware that Logic Pro has an arpeggiator built right in, it's just hidden in the scary environment. I was playing around with it the other night and figured I'd put up a step by step picture tutorial on how to use the arpeggiator in Logic Pro. If you can't see the pictures clearly enough just click on them and you'll get the full size.

STEP 1

Go into Logic Pro's Environment window:


STEP 2

Once you're there go to the top left of the window and select "clicks and ports" in the environment layer menu:


STEP 3

Go into the environment menu "New" and select "arpeggiator":


STEP 4

You can see a little arpeggiator icon show up in the environment window. Nothing will happen until we hook this baby up though:


STEP 5

Click and hold onto the wire that goes from "Input View" to "sequencer input" and drag it over to the arpeggiator:


STEP 6

Click at the edge of the top right of the arpeggiator icon to create a new wire and attach it to "sequencer input":


STEP 7

So now it's all connected and ready to go. You'll notice that when you play a chord it won't arpeggiate until you press play in Logic Pro. You'll also notice that the default arpeggiator setting is pretty boring. To make any changes to the arpeggiator select the icon and a bunch of options appear to the left in the inspector. The main ones you'd want to change is the speed of the pattern (16ths, 8ths... etc), whether the arpeggiator pattern goes up or down in pitch (or whether it's random) and the amount of octaves the pattern span. There's other options as well but those are the main ones that you'll use most often.


Now that I have it set up I have it in my environment at all times and just connect it when I need it. There's also ways to make switches in Logic's environment to turn it on and off but I'm not going to get into that just yet. Really great feature of Logic and sure in hell a lot easier to use than syncing up my Yamaha AN1X to arpeggiate!


My main gig is producer/writer/engineer for my studio called Morph Productions in Toronto, Ontario. Catch the goings on of Morph Productions on your favourite social network or my website:


Catch me on the sites: